I have been painting for just over 4 years now. I am by no means an expert, don’t expect me to be receiving any Crystal Brush or Golden Demon awards. I have never tried an airbrush, despite the fact that it is equal parts terrifying and exciting…hopefully I will be able to soon. This guide is for those who are just starting to paint miniatures. This will give an overall guide to how to make that first miniature something you can be especially proud of. It will walk you through some basic steps to getting table top ready results.
The Materials
First things first, you are going to want to get your materials together. Now if you are painting your first miniature, you do not need to go crazy on brushes and paints. You do not need the top brand to get good results. For brushes, I suggest going to your local craft store and get a couple synthetic brushes in the following sizes: 3/0, 2/0, 0 (or 000,00, and 0) in ROUND tip. These will be your detail brushes to help with the small size of the miniature. Additionally get one small angled synthetic brush. I personally really like Army Painter’s dry brushes, but any angled small brush will do. This will be for dry brushing, which I will explain later. Now, one of the most unsung heroes of the painting world is Masters Brush Cleaner. You should be able to find it at almost any hobby store. This will keep your brushes nice and able to hold a point. You will thank yourself later if you pick some up.
Moving onto paints… You want to be looking for acrylic paints. There are two ways to go about this, for your first time you could go for the cheap craft paints at hobby stores, or you could go to something hobby specific. I would urge you to go with something hobby specific (honestly the brand doesn’t matter all that much in the hobby specific paints) because the craft store paints have less pigment, and do not thin very well. If you use them, you will tend to lose detail on your miniature. Hobby store paints have a variety of pros and cons among their brands. Some brands are thicker than others, and some have more variety than others. It generally comes down to personal preference when painting. I use a mixture of mostly Reaper, with some Citadel supplements (especially metallics). I also do not mind Vallejo. I personally am not a fan of Army Painter, because they are a little thick for my taste. Watch out with Citadel though, and make sure you close those paint pots tight! They dry out extremely quickly otherwise. I also suggest picking up some different washes (black and brown should suffice). Citadel provides a nice line of washes. The final kind of paint you will need to make sure you pick up is primer. There are two kinds of primer, brush on and spray on. I use both depending on the time and season, but I will go further into their pros and cons later. If you want a spray primer, I suggest checking out Army Painter’s spray paints. If you want a brush on, I like Reaper’s brush on primer.
The miniature is also important. There are many to choose from. I am not going to go into how to put together a miniature in this guide, and I suggest for your first one choosing a miniature that does not need assembly. If you want best results following this thread, choose something with some texture. It will help the dry brushing stand out.
The rest is pretty simple. You will need a brush tub. You can just use a jar, though if you do this method I suggest putting a small piece of coiled wire or aluminum foil at the bottom of the jar. This will give you something textured to wipe your brush on and get rid of any excess paint. You will also need a palette. Now there are two types of palettes, dry and wet. Most people will suggest using a wet palette as it helps keep your paint fresh. I would suggest this to someone starting out. I tend to use a dry palette because it is what I am used to, and because I do that majority of my painting in one session. Wet palette is probably smarter though honestly! You should also pick up a small Xacto knife and needle file. Finally keep some paper towels near by.
Washing Your Minis and Getting Rid of Mold Lines
Before you get anywhere near putting a paintbrush on the miniature, there are a few things you should do to maximize your results. First grab that needle file and Xacto knife I mentioned earlier. You should take a close look at your miniature and check for mold lines. If you have a lot of thick mold lines use the Xacto knife to trim them down. Once they are trimmed use the needle file to smooth them out. This will help your paint job look smoother.
Then you need to wash your miniature. Get a cup of warm (NOT HOT!) water, and some gentle soap. Rinse the miniature off and scrub with a toothbrush to release the molding agents that are on the plastic from the factory. This will help make sure all the paint stays in place.
Priming
Priming is a crucial step to painting miniatures, but is also one that many new painters skip. There are two ways that your can prime your miniatures, and both have pros and cons. The first way you can prime a miniature is with a spray based primer. Now a spray based primer is great, because it is naturally thin, and it does not take very long to do. However, spray based primers can be finicky. If you are trying to spray paint in humid or extremely cold weather, your miniatures could come out fuzzy and ruined. Some brands are worse about this than others. I have had bad experiences every time I have used Armory brand spray paint, possibly just because of humid weather in the Midwest. I highly suggest Army Painter as I have never bad a bad experience there. Another difficulty with spray paint is that it can be difficult to hit all parts of the miniature evenly. If you are going to do the spray painting route, make sure that you are in a highly ventilated area, preferably with a face mask (your lungs can thank me later). You will want to spray all around the miniature from around a foot away from the miniature. Remember in the case of primer, less is more. You want the miniature to be covered, but not lose detail.
The other kind of primer is paint on primer. This is nice because it offers the painter complete control over how and where they apply it. It can also be applied in any weather, as you will by applying it inside rather than spraying it outside. I use paint on primers during the winter. However, paint on primers do take a little longer to do, and do run the risk of being put on too thickly. Remember, less is more when priming! I also find that paint on primers come in less variety of colors than spray primers.
What color to pick? That really depends on your miniature. For most of my miniatures I prime black, and work up because it provides a good shadow. It is also nice because the black paint will not show up as an eye sore if you miss a small crack or crevice. However, when painting chibi miniatures or things that require a lot of bright colors I use white. White will naturally allow bright colors to shine more truly to their color.
Base Coat
The first time you touch your paint brush to your miniature you should be applying a
base coat. This will act sort of like a map to your miniature. You will put the colors that you know you want onto the miniature, and then from there add more details. In this coat, you do not have to worry a lot about being super neat. You can clean up any mistakes you make throughout the process. However, you do want to be careful not to apply your paints too thick during this (or any) stage. Thick paints will hide details and texture that you will want to make your miniature stand out. In order to make sure your paints do not go on super thick, you can thin them with a little bit of water. You want the end result of that thinning to be about the consistency of 2% milk or just a little thicker for the base coat.
Apply Wash
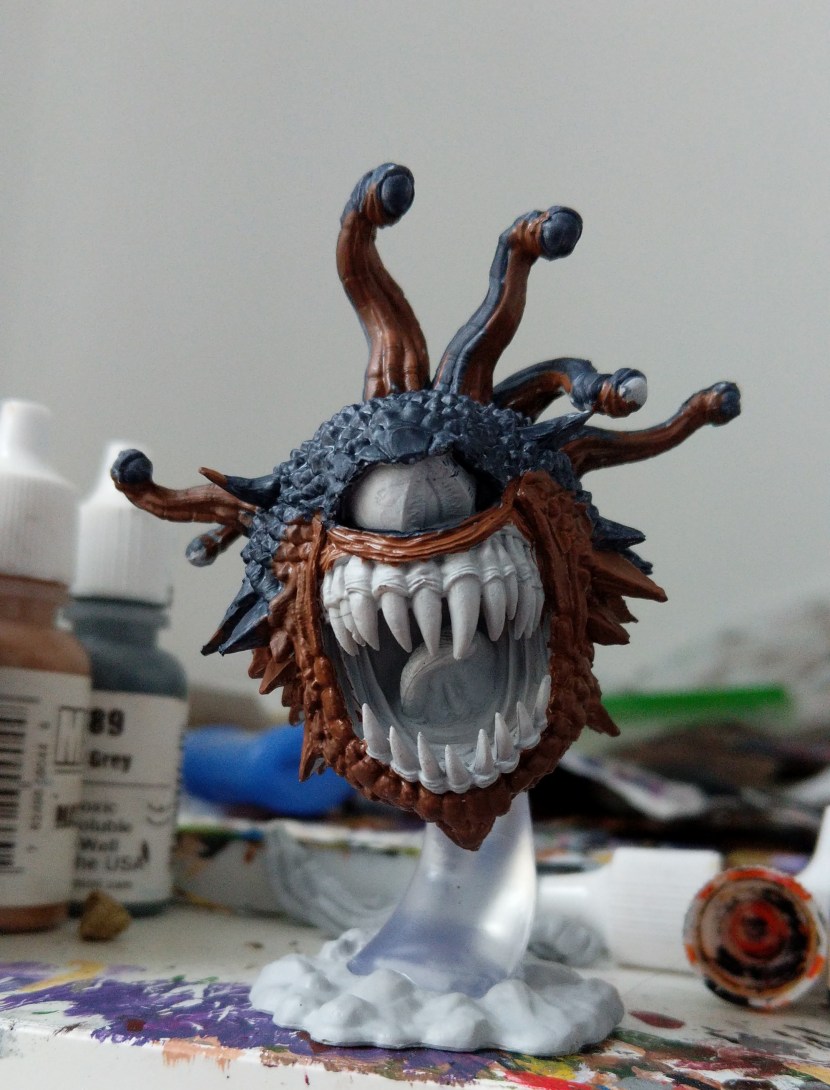
The next thing I would suggest doing is applying a wash. You want to apply a wash over any texture in a color that corresponds to the miniature. For the blue sections on this miniature, I used a black wash. For the brown sections I used a brown wash. This does two things, first it will fill in crevices and help hide spots you may have missed. Second, it brings out details and helps highly where there are textured areas. Be careful to not apply washes on too thickly or you can end up losing detail on the miniature.
Dry Brushing
Dry brushing is the part that is going to really make your miniature pop. I generally dry brush in two parts. First, I go over with a light layer of my original color. This will help

lighten any areas that were too dark due to washes being apply. Second I apply a much brighter second color. This is a way of easily highlighting that will give your miniature more depth. Now how do you dry brush? Take the angled brush you got for this purpose. Put a little bit of paint in the color of your choosing on it. Then the brush and wipe the majority of the paint off onto the paper towel. When you think you have wiped enough off, wipe a little more. What should be left is just a small amount of paint. Then you will lightly use this to paint the miniature. When actually painting the miniature there are two important things to remember about dry brushing. First, you should not be putting much pressure on the miniature at all. Lightly brushing over it is going to give you the best results. Second, you will want to follow the grain of the texture. You should be moving your brush in one direction with the texture. For instance with fur, you will want to go from the top of the fur to the bottom. This will allow the tops or peaks of the fur to get the dry brushed effect, while the bottom remains shadowed. You can repeat the dry brushing process as much or as little as you like until you get the depth that you like for the miniature.
Details
Once you have finished your dry brushing you will go into the final stage of painting.
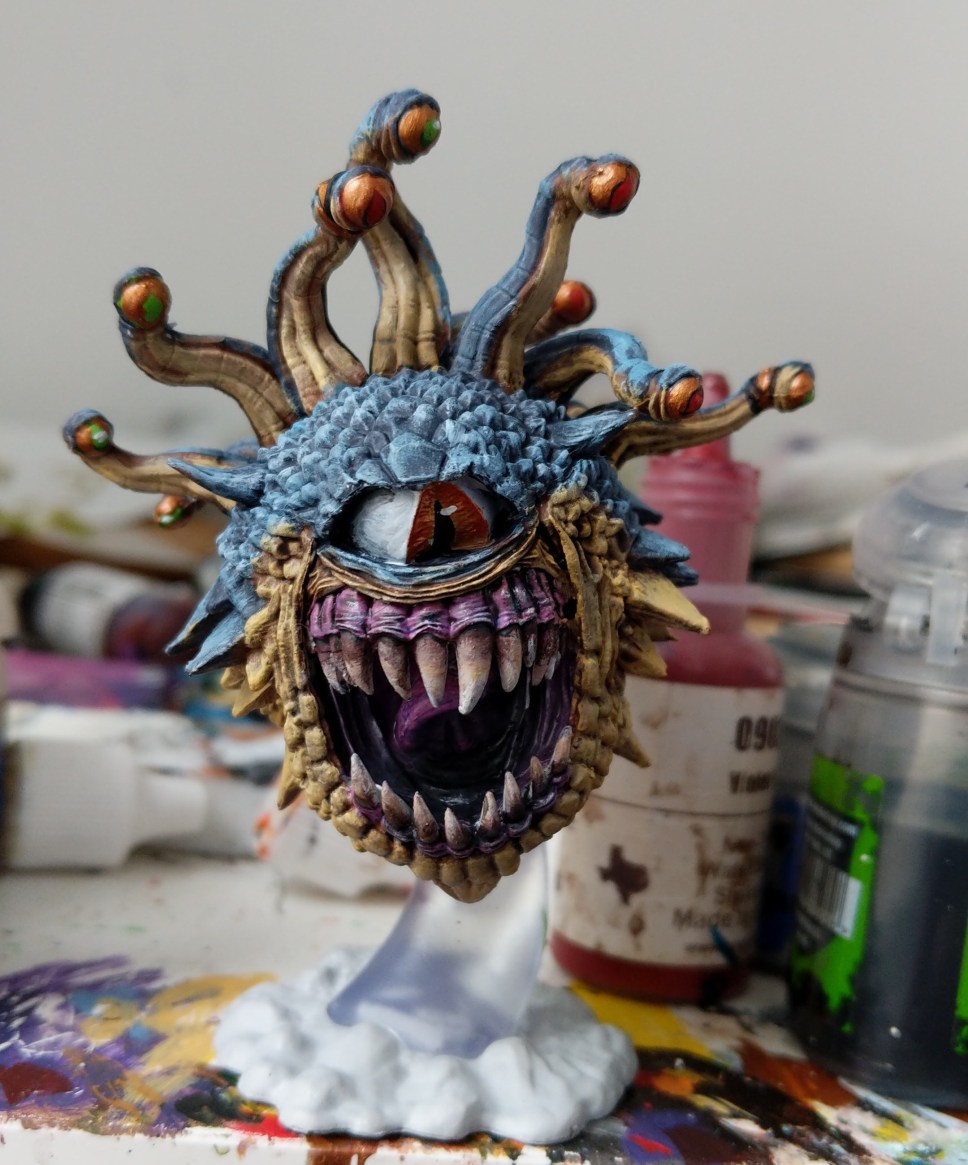
This is the detail phase. What you do during the detail phase will depend on the miniature you are working on. However, generally during the detail phase I concentrate on things like perfecting the eyes of my miniature and adding additional highlights where they are needed. For example on the Xanathar miniature, during the detail phase I worked on the giving the main eye the depth it needed by adding multiple colors in the iris, and adding a white highlight into the pupil. I also added cuffs onto his eye stocks, and completed the other eye stalks as well. These details may include adding more color into the face, blending colors together or adding touches here and there.
Top Coat
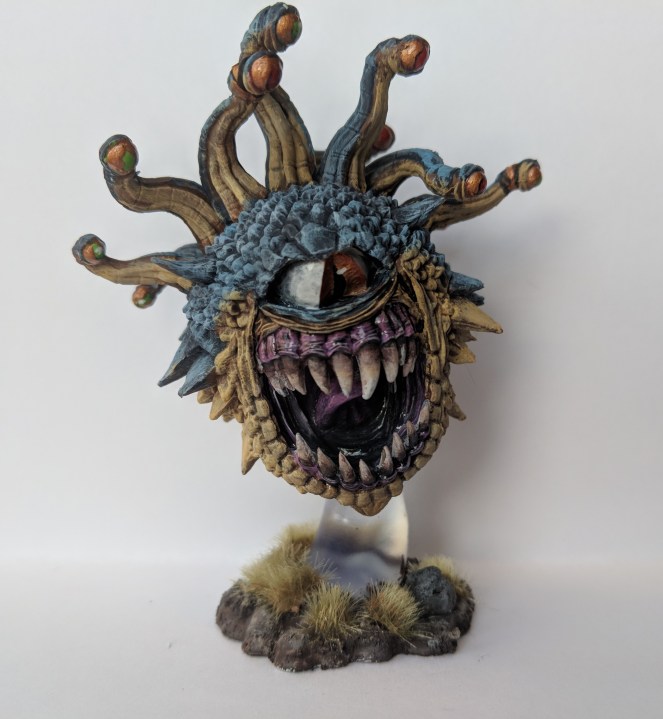
Make sure to finish your miniature with a top coat. This will help protect your miniature as you use it, and ensure that the paint stays in place. I suggest Army Painters No Shine Spray or Testor’s Dull Coat for most projects. Remembering once again, that these are spray paints so be aware of the humidity, and only use them in a well ventilated place.
Final Thoughts
Now remember, this is just a basic process to get you started painting. As you go, you will find that frequently there are stages of blending and working on details between the base coat stage and the wash stage. While you paint, you will get a feel for what works for you, and what each individual miniature needs. However, using this process will help you to have miniatures that you are proud of on your table. Once again, this process works best with miniatures with a lot of texture, but it is still the basis for smooth models as well. I also did not go very far into basing this time, but in the future I will be releasing a basic basing guide as well, for when you are ready to take that next step.

Good overview and good job on the mini!
LikeLike