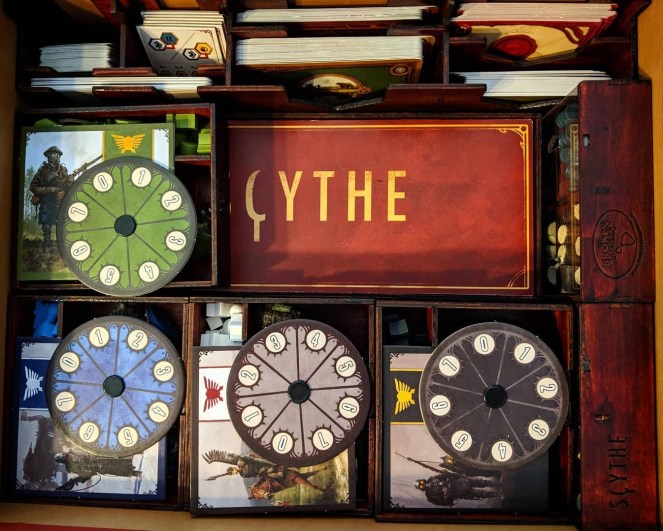
This week for my birthday, I received my first broken token insert for Scythe by Stonemaier Games. Now being the overachiever I am, I decided that I really also wanted to stain the organizer. I have never stained anything in my entire life. I figured I would share what that process looked like for me, and some things that I learned along the way.

First things first, I went shopping for stain. I went to Walmart and picked up two colors of Polyshades by Minwax. I went with Bombay Mahogany and Antique Walnut, not sure which I would prefer. I did a little test on an old IKEA desk which was acting as my work space, and decided that Bombay Mahogany was the way to go. I went with Polyshades because they have the stain and the polyurethane in one. I figured it was best to not press my luck, and instead to do everything at once, so an all in one seemed like the best option for me. I also picked up some brushes and a cloth. Upon arriving at home I set up bunch of paper towels and I was ready to go.
I personally stained all the pieces while they were still unpunched. It made the most

sense to me. I brushed a layer onto one side of all of the punch boards. Then I waited about 6 hours and did all of the next side. I then repeated the process one more time for both sides. Time taken? This part took me about 2 days to complete. One thing I learned from this is less is more on stain. I had a lot of problems with stain pooling in the cutouts. I think the only way to solve that would be less stain. After two days of being up to my elbows in polyshade, I decided it was time to punch out the bits and put them together.
I punched them out, but then had to shelf the project again. The pieces were still tacky, and I was getting really tired of being covered in polyshades. I came back out the next day to work, and learned my next two mistakes. The first one I learned quickly and was able to manage…I punched out my first tile without being super careful. A little bit of the wood splintered (not too bad at least). Going forward I was more careful. Then when I punched out the cardboard, the pieces were not grouped by the board they were punched out of…whoops. While watching the video on how to put the organizer together, I would have to stop and have a scavenger hunt to find the right pieces. It was time consuming but not impossible.

I then made relatively quick work of putting the organizer together. There are a lot of pieces but once you find the right pieces the process of putting them together is actually pretty easy. You will need some wood glue to help keep it together, and I do suggest watching the video. It made everything much simpler. It took about 2 hours to get everything put together. Once it was in the correct configuration, I then did a spot check for stain. The edges especially needed a little work. I finished staining and left it for two more days to dry.
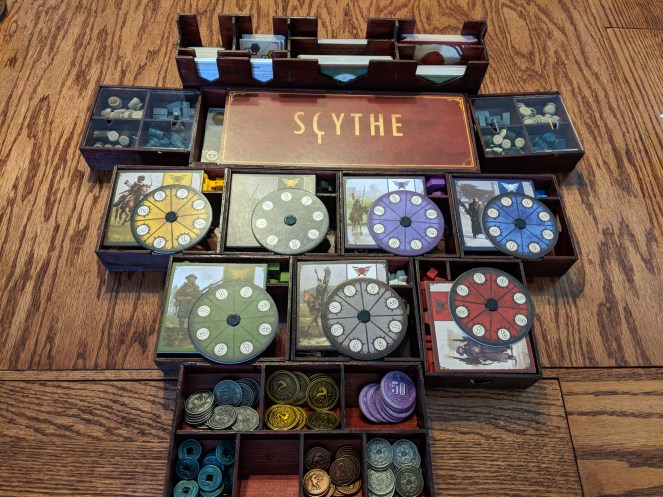
Once everything was no longer tacky and fully dried, I put all the pieces in. I am already excited because I know set up is going to be much faster the next time we play Scythe. Overall, I am happy with how it came out. I definitely think I would get another Broken Token organizer, but I don’t think I would stain it, unless it was for a game I was really passionate about. It took me about a week all in all to complete, working for 3-5 hours each night.
Tips for you:
- Less is more with stain
- Be careful punching out, don’t splinter wood
- Wait an extra day to dry
- Don’t separate punch sheets before assembly

It ended up looking really great! Wanna come help me paint my windows? 🙂
LikeLike
I just finished staining my BT organizer and stumbled here when looking for guidance on how long i should let it dry. I couldn’t help but notice your difficulty though and wanted to comment. Your mistake wasn’t that you put on too much stain. Your mistake was that you skipped an improtant step of the staining process.
You aren’t supposed to paint stain on and let it dry. For stain, you paint it on, wait 5 to 15 minutes and then carefully wipe off any remaining stain that hasn’t seeped into the wood yet with a clean rag. Then you let it dry.
For these organizers I’ve also noticed that because the stain seeps through the cracks (as you observed), after you have wiped the excess off the side you just stained you have to hold it up right and carefully wipe the other side too, to catch the stuff that dripped through the cracks. That was a bit of a pain.
LikeLike
This is true in most cases that you wipe off excess stain, however I was using a one step polyshade. When using a one step polyshade you do not wipe off excess.In the future I might follow the more traditional two step staining which includes wiping off the excess before sealing it.
I was too hasty on wiping off the excess on the other side which was importan. It left my other side looking rough in some places. I learned to do this more thoroughly before putting together my legendary organizer for Scythe though.
LikeLike
I see. I missed that you used the 2-in-1. I can’t confirm but I’ve been told BT recommends not using the 2-in-1, and that they don’t even recommend sealing mist surfaces other than the exterior parts of the full box crates.
LikeLike